Welcome to the next post in the series “Create Cat Perfect Job”. If you haven’t followed and want to get caught up, return to the first post in the series, “Nine Steps to the Perfect Paint Job”. This month, we handle the final phase of paint that coloring, sanding and buffing. With a little patience and technique you can take good paint jobs to the main section. Before we dive, I want to make a note that we will discuss running and painting improvements (in the next blog entry after the last entry next month in the 9 section series).
Start with sanding and buffing
Okay, let’s start! At the last post, we left with a car/truck that had just been painted. You want to wait a few days if you don’t have a week to let the coat that is clearly recovered. My preference is a good old sun to be baked, now with a special candy. The color of the day-light will not be a good idea, but for our settings, we choose solid colors.
The first thing to do is delete all masking, within 24 hours after the paint is applied. Some people like to store all the paper, ribbons, etc. To keep paint, and debris into the vehicle; But the longer you leave it more difficult to delete it and we don’t want to tear the paint!
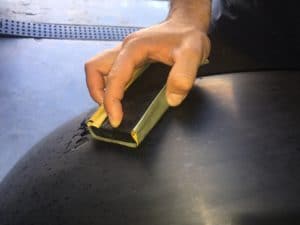
After the masking paper died, we let the car sit in the sun for 10 days. Hundreds of recently in Van Nuys, so I have taken full profit from the weather; The first thing to do is prepare a bucket of clean water with this dish soap will allow wet sanding sliding and not catch tears on the paint. Use sand paper that starts with 1000 grit, and works up to 2000 grit.
Fast tip: You have to stay away from using a sanding by hand only. This will create a wave that will appear after buffing and we don’t want it. Block, a small part of a paint stick is what I recommend. I like to use the radiator hose when it hit the couture spots from the fender and the rear quarter panel, or anything that has a flat surface that will help reduce the orange peel (small ripples in clear coats).
Use the Cross Hatch Method sanding (north to south and then returning and hitting the east to the west). After you start making substances like milk, you know you knocked down a clear coat. Among each sanding, you want to stop and release the sandpaper and let the block squeeze water and debris.
Check your sanding work
After that, check the surface; What you are looking for is the final layer of gentle tangled from orange or running skin. Start behind the vehicle – Cover the trunk is where I go to its place. Often I will stop sanding, and use my block to clean up most of the water, I will return with a dry cloth, allowing the surface to become dry.
I then began to see it from every corner to see how I came. After I was satisfied with that part, I continued until the entire car was sanded. Key notes: stay away from the back of the hill or tight spots where the buffer cannot reach. Now do not panic if you say you have a car down and start rubbing just to find out that there are parts that still have orange peel. Stop immediately and bring back the sandpaper and sand that part again.
Don’t be afraid to go through sandpaper, you want to let the paper do the work of cutting a clear coat. No need to press too hard, doing that will cause waves, and in some cases you will burn a clear coat!
Rubbing it
Now is the time to use the Rotary buffer, wanting to regulate it at the lowest speed, this process comes in three stages:
- Heavy Poland to issue scratches.
- Medium Poland will eliminate scratches and fine imperfections.
- Poland Glazing to give you a mirror like finished.
Using wool bearings (you can use foam, even though I prefer old school), applying the first phase of the small number of Poland; Most of the polish come in large bottles. I like to transfer each of the three polish into a small hand bottle for easy applications during polishing. I also applied the polish to the surface first then let the wool bearing to move in the left to right movement, while it did not stop for fear of burning paint.
Use a generous amount of each nail polish and take a small part of the car at the time between each stages of polling. I wiped the paint with a clean cloth, every paint phase would require my own pad.

I like to use two -sided wool bearings, then for the medium stage, black foam bearings, and for the last part of light blue foam bearings to finish with glaze. If you have deleted fender, hood, and luggage for paint, you want to handle each part separately using a saw horse that will not allow pieces to slide around or cut paint. 
Remember there are several ways to do the sanding and buffing stages to create the perfect paint work, and this is mine; But we can all agree that the end result must be the final result of the mirror we are looking for.

Next month we finish this series with the final phase of fit and finish, so until then, congratulations on sanding!
News
Berita
News Flash
Blog
Technology
Sports
Sport
Football
Tips
Finance
Berita Terkini
Berita Terbaru
Berita Kekinian
News
Berita Terkini
Olahraga
Pasang Internet Myrepublic
Jasa Import China
Jasa Import Door to Door
Originally posted 2025-09-08 17:35:01.