Going to the new year, I think it will be a good idea to reach the brakes. This subject is one of the most important aspects of dealing with classic car restoration.
This is not necessarily a part of the way, but more like the overall view of what to remember when traveling to the world of DIY upgraded brakes.
The braking story becomes bad
A few hundred years ago I drove on a winding road at Mission Hills, I had an AM radio that exploded at my 1966 Ford Galaxie.
I took a few rounds that I did not carelessly calculate the speed, sharpness, or level – and in turn, not seeing Pontiac Ferrero 1985 quickly approaching the left.
When I pressed the brakes and improved my position, I had issued a 2 -foot wound on the side. No need to say, this can all be avoided with some improvements on my side.
In 1967, Federal Motor Vehicle Safety Standards 105 set specific performance tests, which caused the introduction of disc brakes that were widespread in American cars in the early seventies.
Before that the single port “Jar Honey” or Death Pot because I like the call (due to the fact that if there are parts that are hardliners, soft lines, wheel cylinders or master cylinders are compromised, the whole system will fail), some length of the car needs to be considered when driving an all-wheel drum car.
Before you convert your brakes
Before we enter the brake conversion there are several main key elements that you want to remember when changing the brakes.
The first and most important is to determine whether you will use your stock wheel. Most of the 50s, 60s, 70s, vehicles have 14-inch or 15-inch rims that will limit the size of the rotors and calipers that you use to convert your front drum brake to disk.
The second thing to consider is a proportional proportional valve or valve. This will allow the full flow of brake liquid to your front disc brakes, and narrow the flow to the back drum.
Without a Prop valve, your rear drum will have a tendency to lock you as you brake hard, causing the back end to the fishtail. The third thing to remember is if you are going to use a brake reinforcement.
You will need at least 18 psi vacuum that comes out of the engine’s intake manifold so that the booster is functioning properly.
If you run a performance camera, you must use the help of electrical and tubes, to get the emptiness you need to make the brakes work effectively.
The fourth choose the right conversion kit for your budget. There is a dozen kit out there ranging from quite expensive to very expensive.
You want to remember that you want to go with a company that will have your available parts for you on the phone; Especially when you change the bearing, rotors, etc.
I found a company that made a kit that would allow you to use modern vehicle parts to complete your conversion – this company called Scarebird.
The following is a quote from the settings for 49-53 Ford.
Convert your classic Ford 1949-53 into a front disc brake with this brackets (made in the US). They are designed by AutoCAD and CNC Laser to be deducted for excellent tolerance.
This brackets use public and cheap rotors (1970-73 Mustang Front, 11-1/4 ″) and Calpers/Pads (1988-91 Chevrolet or GMC 1500 Work Truck) available from the nearest Napa, O’reilly’s, Autozone, etc. Or even your local boneyard.
Unlike other designs, this settings will allow you to maintain the drum stock rim 15 ″ as shown by the image below.
Also note that the brackets are done to allow the use of the original attachment hardware and by doing so maintain your Ford alignment settings.
Rotor Mustang also has the same pilot diameter (2.43 ″) like your OEM rim – making your rims properly centered by the hub, not lugs. Offset is in 1/8 ″, preserving your original attitude.
This is what I like from these people is the use of modern components available in your local spare parts, plus the price is very reasonable compared to other disc brake conversions.
There are 3 most common improvements that will work well in your classic vehicle. I will give an example for every conversion.
1. Conversion of a single Master Port cylinder to the Master Port cylinder, then add the brake booster to the settings of all your drums.

A few years ago, I had the opportunity to work at Oldsmobile Dynamic 88 1964. This is an All-wheel drum that is set with a single Master Port cylinder “Death” without electricity regulation.
Now this car looks very similar to Impala that year, and I think this will be a piece of cake. I will find the Impala brake conversion that will allow me to keep the stock wheels.
Now to horrify me after buying a kit, I tried to mock the rotor and caliper to Spindle. I found that they were very different, and I was destroyed.
After a few goals, I contacted the owner who was disappointed to hear that there was no kit out there who would work with the arranged stock wheels.
That day I came home determined to find several ways I could increase the strength of the braking of parents. After a few days of research, I finally made a plan.
If I can’t change my own brakes, I can replace the Cylinder master (with which I bought Cadillac Dual Master Cylinder 1966 with the brake booster, which literally is a bolt in the application).
This will separate the front wheel lines from the rear wheels, thus providing additional security if one or another fails.
I really have to run two new lines to the front wheels, but wow! The difference is with the help of brakes, it comes out better than I expect.
2. Convert the Single Port Master Cylinder to a Double Port that is set to exchange front brake drums for the disc brake.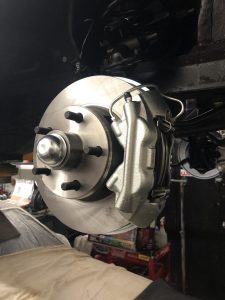
A few months ago, I did this disc brake conversion in Mustang 1965. This kit is different in the aspect that the car has a manual transmission.
The owner wants to keep the steel wheel stock, but does not want to cut the support beam to match the double master cylinder with the brake amplifier.
Fortunately I found the perfect kit, and used a modern plastic brake reservoir for a cylinder master; Renewing it to the next Mustang proportional valve model.
3. Conversion of a single Port Master Cylinder to a double port arranged upward Exchanging front and rear wheel drums arranged with disc brakes.
The last conversion that I did on 66 Chevy C10 a few months ago. There is no cost, the owner wants to go with a nine yard spindles drop.
I immediately know Wilwood is a brand to use. This is a high -performance truck that we need the best to slow down LS1.
I have nothing but a great experience with this company for many years, the only weakness is that they can be very expensive.
In conclusion, it’s up to how much you want to spend. These are some of the many examples that you can use as a reference. In the end you will relax and be sure that your classic will stop with change!
News
Berita
News Flash
Blog
Technology
Sports
Sport
Football
Tips
Finance
Berita Terkini
Berita Terbaru
Berita Kekinian
News
Berita Terkini
Olahraga
Pasang Internet Myrepublic
Jasa Import China
Jasa Import Door to Door
Originally posted 2025-08-30 03:20:17.